Rocking The Cloche

So, after making my Boho cloche hat, I thought I would make something a bit more subdued while sticking to the concertina hat theme for the online course I am doing.  I recently ordered a bunch of Merino wool for making hats, but I also have a lot of Corriedale tops and slivers.  The slivers are good for needle felting and it does wet felt quite well, but it is not so good for wet felted paintings as the wool migrates too much and dulls the top colors down, although it is good for topping up a wet felted piece.  I have also learned that it is not great for hat making, as although it felts really well, it is a little bit itchy, even when sandwiched between layers of Merino!  If the hat gets too itchy, I might sew a hat band on the inside.  I have been trying to use up my Corriedale sliver stash as best as I could so this was a learning curve.  Although I have a lot of bright colors in Merino, I don’t have much in the way of natural colors.  Even the black is dyed.

Downloads2-004

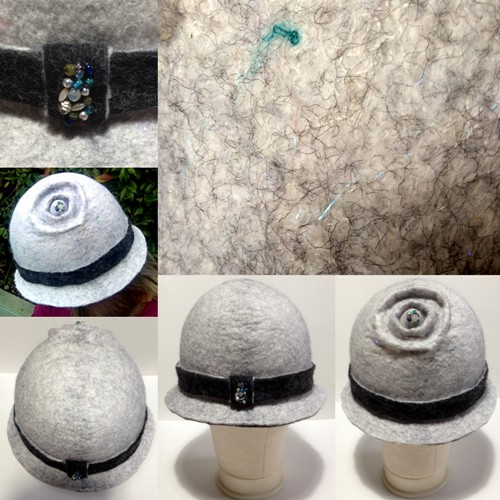
I wanted a nice sturdy cloche hat with a brim so I was going to make it with six layers.  I used black Merino batt for the first two layers.  I peeled the batt nice and thin, wet it out, and then I added two layers of grey Corriedale slivers.  In hindsight, I should have just used four layers of Merino batt and forgot about the slivers.  For a Merino batt, the black was quite coarse, so I am not sure if I will order it again.  It was the first time I used it and you can only get the batts in 200g minimum.  I will most likely use it up for needle felting or making a different type of vessel, such as a bag, cozy, or slippers.  For the last two layers, I used a bright white Merino top in Lightning.  It is very white and great for beards and clouds.  I was loving the white, but I knew that the wool underneath would migrate and tone it down.  Perhaps if I did the white first and felted it inside out it wouldn’t have gone quite as grey (I might try that next time).  I added white sari silk fiber and Angelina all over the top for some shimmer and sparkle.  You can just about see the Angelina in the close up as well as some other threads that were in the white sari silk.  I shaped the hat on two different hat blocks.  The wig/hat block you see above is my actual head size (it is child sized), but it is not so easy to make a brim on this type of block.  I used my smallest polystyrene hat block to gauge where the brim should be and worked on that for a little while before doing the final shaping on the wig block.  I had to trim off a fair amount off of the brim as I had modified a cloche template for a fold up brim.  I used the trim to make a band around the hat and then I stitched some beads on the center of the rosette and on the hat band.  Although you can’t tell from the photos, this hat is very sparkly, but in a subtle way.  That is one nice thing about Angelina, it catches the light.  Funny that the sari silk didn’t work as well as expected, even though I did cover the whole hat with it.  I think the migration of the Corriedale wiped it out and only left the colored threads.

The weather is too rubbish today to get a decent photo.  Even when the rain stopped, I couldn’t get a clear picture of the hat as it wanted to go white.  Winter is here now, so I am not very hopeful about posting great photos for some time yet!  At least I have a lovely warm and sparkly hat to keep my head toasty!

A Reversible Boho Cloche Hat

Downloads2

Here I modified the snail hat template to make a cloche with earflaps.  I used merino on the inside and Corriedale tops on the outside with some sari silk for embellishment.  I had ordered loads of Corriedale tops when I was making vessels and thought I would see how it would work on a hat.  As you can see, the colors are quite vibrant as they come in all the same colors as merino, but is a bit cheaper.  It does felt well, but you need to work it a bit more.

IMG_5683

Here it is all wet out and ready for a massage.  It took ages to shape on the hat form as the top could have been wider.  Note for next time. I bought a mini steam iron for just this sort of thing and steaming the top of the hat helped to really stretch it over the form.  This is what the hat looks like reversed.

Downloads2-001

I used 4 layers this time.  I thought 6 layers would have been too much, and definitely 2 would have been too little, so 4 is right in the middle (though 5 would have been ok too!)  The 4 layers make it a little bit flexible for reversing it.  I am in-between contracts at the moment, so I have had a bit of free time these last few days.  I have been watching YouTube video tutorials on how to make flowers.  There are so many talented people out there.  The first flower brooch I made for the blue hat was made by making a piece of felt and then cutting pieces out and stitching them together.  I didn’t need a tutorial for that, but it is a common method of making flowers.   This time, I used a multiple resist method which connected all of the layers together in the center.  The down side to this method is that it does take a long time to dry!  I have also seen people use sanders when making a hat.  It does cut the time down and can make a very nice fine felt.  So the hubs researched a good and cheap one to buy, so guess how I am going to make my next flower brooch!  This is what the hat looks like on.  Please remember that it is winter in England and I don’t have a lovely young model with a small head to model my hats.  It is just me and some bad lighting.

Downloads2-002

I’m really happy with how the hat turned out.  Off to make another one now!

Wet Felted Blue Hat

Downloads2-026

I mentioned that I am doing an online concertina hat course.  This is the hat from the lesson.  I did not quite follow the lesson for the previous hat I made as I had made one already that I hadn’t been happy with and so it was modified.  This one also didn’t quite turn out how I wanted as I feel that the percentage rates given were not quite correct, though I followed them anyway.  I thought the resist was too big.

In any event, I am learning to adapt.  This hat is made from blue and turquoise merino with sparkly threads and a silk blend.  I would have liked more of the dark blue, but there was no way I could shrink it anymore and had to cut some off.  Though in hindsight, I could have made a hat with a wider brim.  Live and learn.  In fact, with every make, I learn something new.   This was also the first time I made a brooch.  I made up some felt from the same colors in the hat and then when it was still damp, I cut shapes from a cookie cutter.  I then found a nice button and some beads and stitched it all together.  Easy peasy!  Here is what it looks like on.  Please note that this is not a selfie.  I am merely trying to take a photo of the hat! 🙂

Downloads2-027

It’s quite jaunty and snazzy!  Not the best look with a fleece, but I would wear it out and about with slightly smarter clothes!